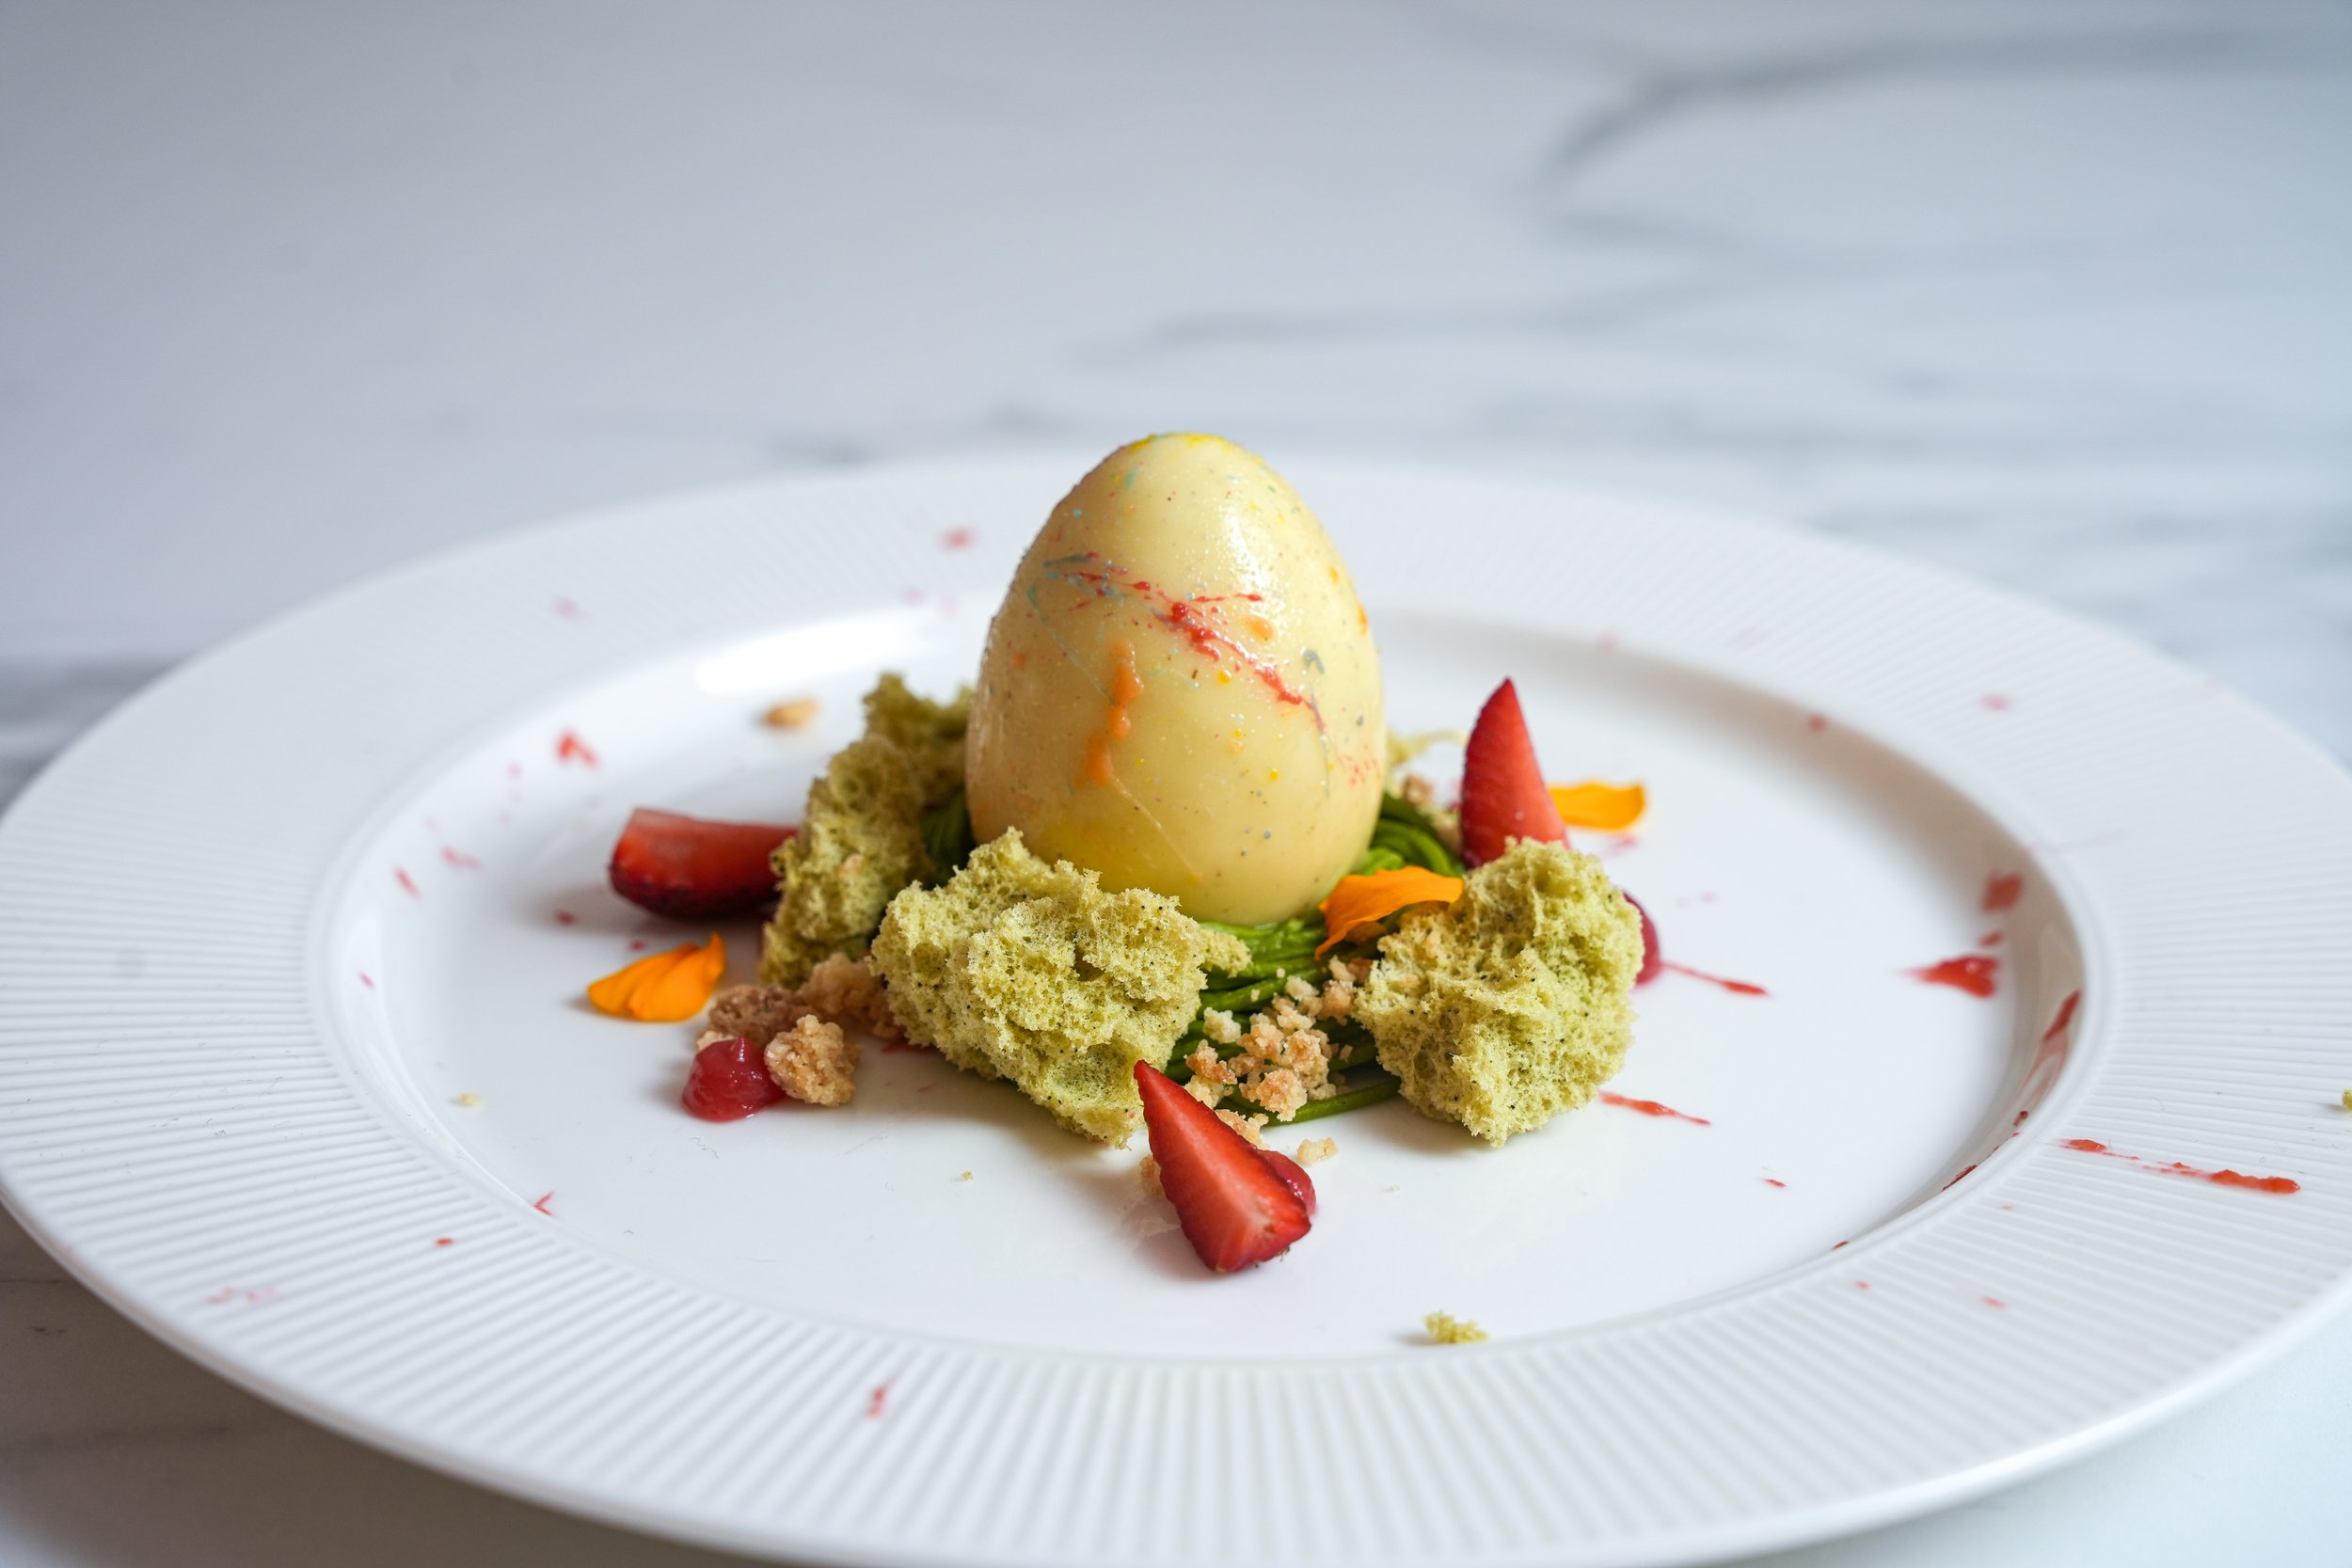
"Colourful Egg" - Easter Plated dessert
This year, for my Easter-themed dessert, I decided to create a dish called "Colourful Egg." As the name suggests, I crafted a blood orange mousse in the shape of an egg, then splashed with some colored cocoa butter, all to bring a smile to the customer's face.
The plated dessert is incredibly simple to prepare, allowing you to get everything ready in advance, including the egg mousses. You have the option to replicate the plated dessert exactly as it is or customize the flavors to your liking. Don't forget to share your creation with me if you decide to recreate it!
Recipe for 8 plated desserts
Strawberry insert
200g Fresh strawberries, chopped
10g Acacia honey
15g Caster sugar
10g Fresh lemon juice
In a saucepan, combine all the ingredients.
Bring to a boil. Reduce the heat to low and simmer until the strawberries are all soft and just starting to fall apart and the liquid thickens, between 5 to 10 minutes.
Let the compote cool off completely.
Fill the semi-sphere with the strawberry compote and freeze.
Blood Orange Mousse
4g Gelatine powder (200 bloom)
20g Cold water for the gelatine
80g Whole milk
100g White chocolate
30g Blood Orange juice
165g Whipped cream
In a small bowl, sprinkle gelatine powder over cold water. Let it sit for 5-6 minutes to hydrate.
Heat the milk in a small saucepan over medium heat. Once warmed, add the hydrated gelatine and whisk until fully dissolved. Remove from heat.
Place the chopped white chocolate in a heatproof bowl. Pour the warm milk mixture over the chocolate and stir until the chocolate is completely melted and the mixture is smooth. Let it cool down to around 30°C.
Once cooled, gently stir in the blood orange juice until well combined.
In a separate bowl, whip the cream until it reaches soft peaks.
Gently fold the whipped cream into the orange-chocolate mixture in two batches until fully incorporated.
Transfer the mousse mixture into a pastry bag.
Fill the egg-shaped silicone molds halfway with the mousse mixture. Place a frozen strawberry insert in the center, then fill the molds with more mousse mixture, covering the insert completely.
Place the filled molds in the freezer for 1-2 hours, or until the mousse is fully frozen.
Chocolate shell
120g Cocoa butter
200g White chocolate
Cocoa butter in different color for splashes on the eggs
In separate bowls, melt the white chocolate and cocoa butter using a double boiler or microwave in short intervals, stirring frequently until fully melted.
Once melted, combine the cocoa butter and white chocolate together in a mixing bowl. Use a spatula to mix until smooth and well combined.
Allow the mixture to cool down to around 30°C, ensuring it's still in a liquid state but not too hot.
Pierce the end of an egg-shaped frozen mousse with a wooden skewer. Dip the frozen egg into the container with the chocolate mixture, ensuring it's fully coated.
Remove the coated egg from the chocolate mixture and allow any excess chocolate to drip off.
Place the coated egg on parchment paper to set. Repeat the dipping process for the remaining frozen mousse eggs.
Use different colored cocoa butter to create decorative splashes on the coated eggs. Simply drizzle or flick the colored cocoa butter over the eggs using a brush.
Allow the chocolate shell to defrost in the refrigerator.
Matcha Microwave Sponge (without siphon)
100g Whole eggs
30g Caster Sugar
50g Plain Flour
3g Matcha powder
1g Baking powder
In a mixing bowl, whip the eggs and sugar together until foamy and pale. The mixture should form ribbons when the whisk is lifted but should not collapse immediately.
Sift the flour, matcha powder, and baking powder together. Gradually add this dry mixture to the egg and sugar mixture, folding gently with a spatula until just combined. Be careful not to overmix.
Prepare 3 large paper cups by making small holes at the bottom to allow steam to escape during cooking.
Divide the batter evenly among the prepared paper cups, filling each one to about 30g.
Cook each cup separately in the microwave for no more than 30 seconds on high power. Cooking time may vary depending on your microwave, so keep an eye on the sponge to avoid overcooking.
Once cooked, carefully remove each sponge from the microwave and allow them to cool completely by placing them upside down on a cooling rack or over the edge of a counter. This helps prevent the sponges from collapsing.
Once cooled, carefully break the sponges into smaller pieces, being gentle to avoid crushing them.
Matcha ganche
300g White chocolate
150g Heavy cream
30g Inverted sugar
10g Matcha powder
Semi-melt the white chocolate by chopping it into small, uniform pieces and placing them in a heatproof bowl.
In a saucepan, heat the heavy cream and inverted sugar over medium heat until it just starts to simmer. Remove from heat immediately.
Pour the hot cream mixture over the semi-melted white chocolate. Let it sit for a minute to allow the chocolate to soften further.
Using an immersion blender, blend the mixture until the chocolate is completely melted and the ganache is smooth and homogeneous. Ensure the immersion blender is fully submerged to avoid splattering.
Sift the matcha powder into the ganache and continue blending until fully incorporated, ensuring there are no lumps.
Allow the matcha ganache to cool to room temperature, stirring occasionally to prevent a skin from forming on the surface.
The next day, whip the ganache until it reaches a slightly lighter consistency.
Transfer the whipped ganache into a piping bag fitted with a nozzle suitable for creating grass-like decorations.
Blood Orange gel
150g Blood orange juice
50g Lemon juice
20g Caster Sugar
1g Agar agar
In a small bowl, combine the agar and caster sugar.
In a saucepan, bring the juices to a boil over medium heat.
Once boiling, add the sugar-agar mixture to the saucepan, stirring continuously to ensure it dissolves completely.
Boil the mixture for 1 minute, continuing to stir constantly.
Remove the saucepan from the heat and pour the mixture into a jug or tall container.
Allow the gel mixture to set completely until it reaches room temperature and becomes firm.
Once set, use a hand blender to blend the gel until it reaches a smooth, gel-like consistency.
Transfer the gel to a piping bag and store tin the fridge.
Extra for plating:
Fresh strawberries
Edible flowers
Plating:
Begin by piping 2 dots of orange gel in the middle of the plate. Then, using the back of a spoon, create some splashes around the dots.
Pipe the matcha ganache onto the plate, forming a circle around the orange gel dots.
Place the defrosted egg mousse in the center of the circle formed by the matcha ganache.
Add pieces of matcha sponge on top of the matcha ganache, arranging them around the egg mousse.
Pipe some additional dots of orange gel close to the matcha sponge for added flavor and visual appeal.
Finally, decorate the dessert with fresh strawberries and edible flowers to add a burst of color and freshness.
